Deploy OpsiMate
OpsiMate ships as two published images — opsimate/backend (the API and the worker) and opsimate/frontend (the web UI) — and the supported way to run them is the Docker Compose file in the main repository. This guide covers the one-line installer, the same setup done by hand, and Kubernetes with Helm or Terraform.
Make sure your system meets the system requirements and that Docker is installed and running.
Quick Start (Recommended)
The easiest way to get started with OpsiMate is using our one-line installation script:
curl -fsSL https://raw.githubusercontent.com/OpsiMate/OpsiMate/main/scripts/start-docker.sh | sh
This script will:
- Download the latest OpsiMate Docker Compose configuration
- Set up the necessary directories and permissions
- Start OpsiMate using Docker Compose
- Verify that all services are running correctly
Once the script completes, OpsiMate will be running at http://localhost:8080. You'll be able to register your first admin user and start managing your infrastructure right away!
Docker Compose (manual)
If you'd rather see each step than pipe a script into sh, do what the installer does by hand.
1. Get the two files into the directory you want to deploy from:
curl -fsSL https://raw.githubusercontent.com/OpsiMate/OpsiMate/main/docker-compose.yml -o docker-compose.yml
curl -fsSL https://raw.githubusercontent.com/OpsiMate/OpsiMate/main/default-config.yml -o config.yml
config.yml is the repository's commented default-config.yml; the compose file mounts it into the containers as /app/config/config.yml.
2. Create the data directories the containers mount:
mkdir -p data/database data/private-keys
3. Pull the published images, then start. This matches what the installer does.
docker compose pull backend frontend
docker compose up -d
Three containers come up: backend (the API on port 3001), worker (the same image, running the queue worker) and frontend (the UI on port 8080).
Volume Mounts
| Volume | Purpose |
|---|---|
./data/database → /app/data/database | The SQLite database. Every alert, user and integration lives here — this must be on a persistent volume, or the data is gone when the container is replaced. |
./data/private-keys → /app/data/private-keys | Where OpsiMate writes the secret files it stores for you; likewise persistent, and the path is required by the configuration. |
./config.yml → /app/config/config.yml | Configuration. See the configuration guide. |
Verify Deployment
# What is running
docker compose ps

# Backend logs
docker compose logs backend

# Health check — the API answers "ok"
curl http://localhost:3001/health
The health endpoint belongs to the API server on port 3001. Port 8080 is the web UI.
OpsiMate is now running at http://localhost:8080
Register a user for the first time - it will be the first admin user
First Login
When you first access OpsiMate at http://localhost:8080, you'll be prompted to create your first admin user:
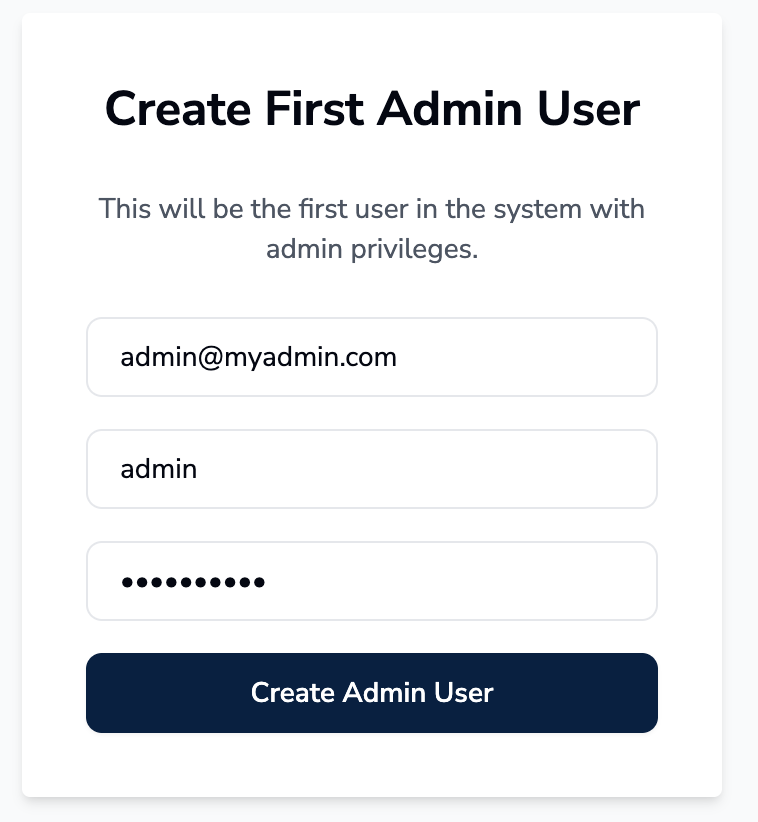
Simply fill in your email, full name, and password to create the initial admin account. This user will have full administrative privileges to connect integrations and manage users, and access to all OpsiMate features.
The defaults are chosen to make a first run easy, not to be left in place:
- Set
JWT_SECRETandENCRYPTION_KEYin the backend's environment. Both fall back to placeholder values published in this repository if you don't set them, which means anyone with the repository can mint sessions and read stored integration credentials. - Change
security.api_tokeninconfig.ymlfromopsimate— it is the shared token every monitoring tool sends with its webhook. On Helm, setapi_tokenundersecurityinconfig.configYml;secrets.apiTokenis ignored because the chart loads a config file. - The API also exposes
GET /metrics; setMETRICS_TOKENif that endpoint should not be open.
Details in the configuration guide.
Kubernetes
Helm chart
The chart lives in infrastructure/helm in the main repository. It needs Kubernetes 1.23+, Helm 3+, and a persistent volume provisioner.
For local testing (Docker Desktop, Minikube) both services are exposed so the browser can reach the API directly:
cd infrastructure/helm
helm lint .
helm install opsimate . -n opsimate --create-namespace \
  --set service.frontend.type=LoadBalancer \
  --set service.backend.type=LoadBalancer
Then open http://localhost:8080; the frontend calls the backend on localhost:3001.
For production you keep both services ClusterIP and put an Ingress in front, routing /api to the backend and everything else to the frontend. The backend then never has to be reachable from outside the cluster.
The chart README has the full values table, the production and EKS examples, and the reasoning behind the two shapes — it is the place to read before you change a value: infrastructure/helm/README.md
Terraform (AWS EKS)
infrastructure/terraform provisions the AWS side of a cluster: a VPC with public and private subnets across the availability zones in var.availability_zones (two in the example terraform.tfvars) and a NAT gateway, an EKS cluster with a managed node group, the IAM roles the cluster and nodes need, an EBS CSI driver role so persistent volumes work, and the security groups. The variables have no defaults, so first create a terraform.tfvars in that directory — the README has an example to copy — and run terraform init && terraform plan && terraform apply. Then point kubectl at the cluster with aws eks update-kubeconfig and install the Helm chart above into it.
Full details, variables and outputs: infrastructure/terraform/README.md
Next Steps
After deployment:
- Access OpsiMate at
http://localhost:8080 - Configure your settings - See configuration guide
- Connect a monitoring tool - Integrations overview
- Check system requirements - System requirements
Support
If you encounter issues during deployment:
- Check the configuration guide
- Join our community discussions
- Report bugs on GitHub Issues